Automating the deployment of a VPN on AWS using Terraform, Packer and Ansible
Joel Freeman•
vpntodo-appawsdevops

This article is meant to demonstrate one possible way of integrating Packer, Ansible, Terraform and Pritunl (an open-source enterprise VPN) to deploy a VPN on AWS.
Before we continue, all the sources used in this blog post are available in this GitHub repository. If you don't wish to read the entire blog post you can take a look in the GitHub repository.
#Table of Contents
- Table of Contents
- Introduction
- Set-Up
- Creating the AMIs
- Deploying the infrastructure on AWS using Terraform
- Configuring Pritunl
#Introduction
When deploying software or infrastructure in the cloud it is a best practice to secure access behind a VPN.
In this blog post I'll be going over how I automated the deployment and configuration of a VPN to AWS achieving Infrastructure As Code using Terraform, Packer, Ansible and Amazon Machine Images (AMIs).
With this we can achieve near fully-automated, reproducible deployments of Pritunl VPN on AWS.
#How it works
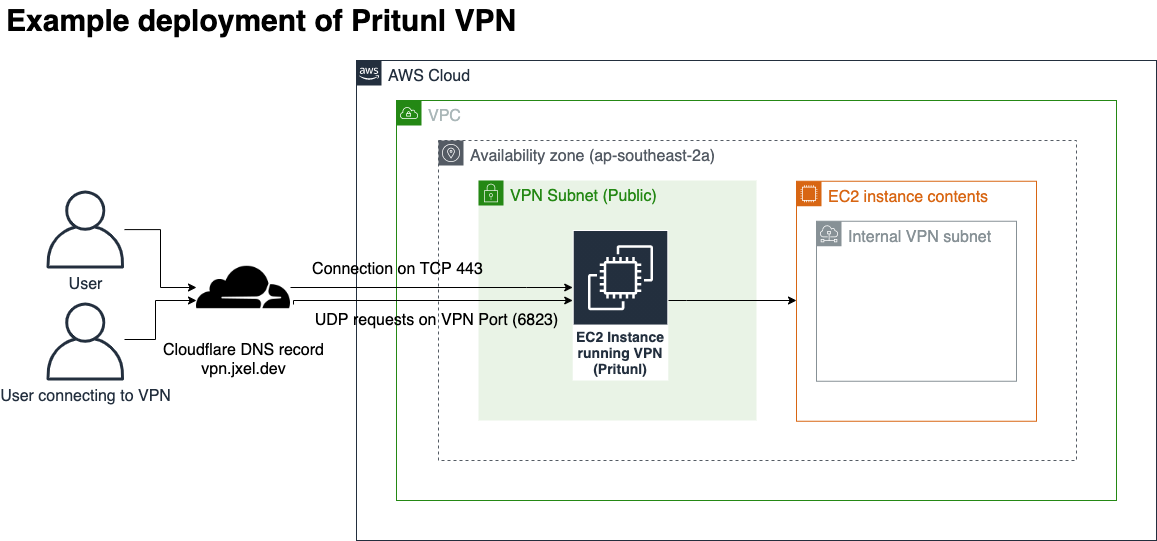
Below is a diagram of the AWS resources for an example single-node deployment of Pritunl on AWS. There are a few things to note about the example deployment:
This deployment is not highly available and not suitable in a production environment. Pritunl requires a paid subscription for clusters so this is limited to a single node. This is the primary reason why it is not highly available.
If your requirements for a VPN contain high availability, then you may want to look elsewhere as this blog post covers a single node deployment. If high availability is desired, you could create an Autoscaling Group containing Pritunl nodes spanning across mutlitple Availability Zones and have two MongoDB hosts instead of everything on a single node.
The security group allows the following ingress traffic by default:
- 0.0.0.0/0 -> TCP 80 (required for LetsEncrypt cert generation)
- 0.0.0.0/0 -> UDP VPN Port
- [Home IP], [VPN Client CIDR] -> TCP 443, TCP 22 (SSH)
While HTTP is allowed from all IPs, it redirects to HTTPs so I don't believe that this is much of an issue.
All egress traffic is allowed.
There are two users in the diagram below. The first user is accessing the web UI on Port 443 and the second is connecting to the VPN.
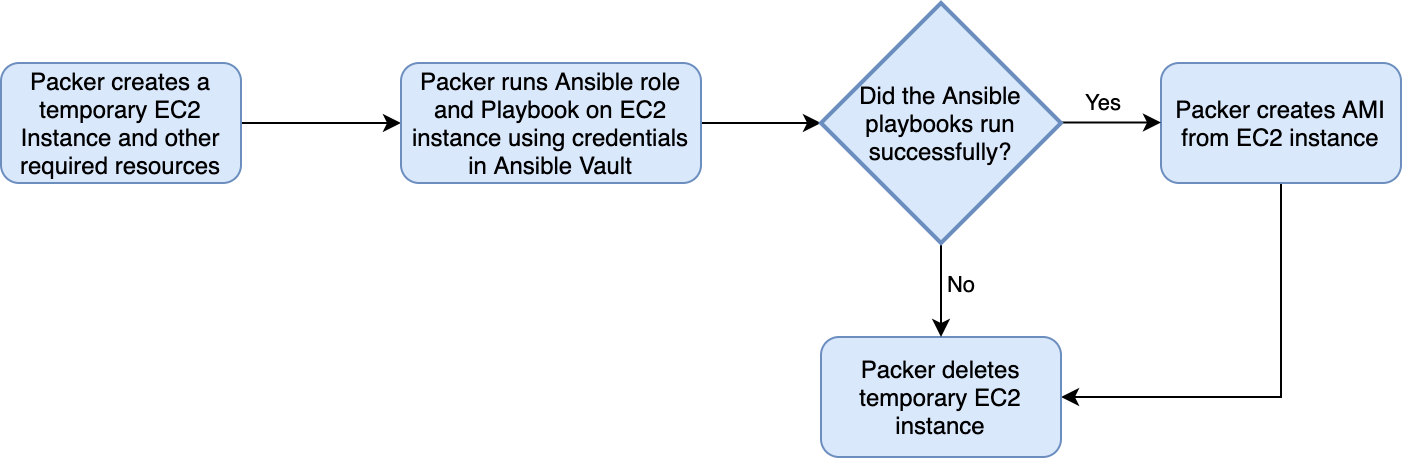
Below are diagrams which describe the process of building the AMIs and deploying the VPN on AWS using Terraform.
First we create the base AMI:
Then we create the second AMI, which has Pritunl installed and partially configured:
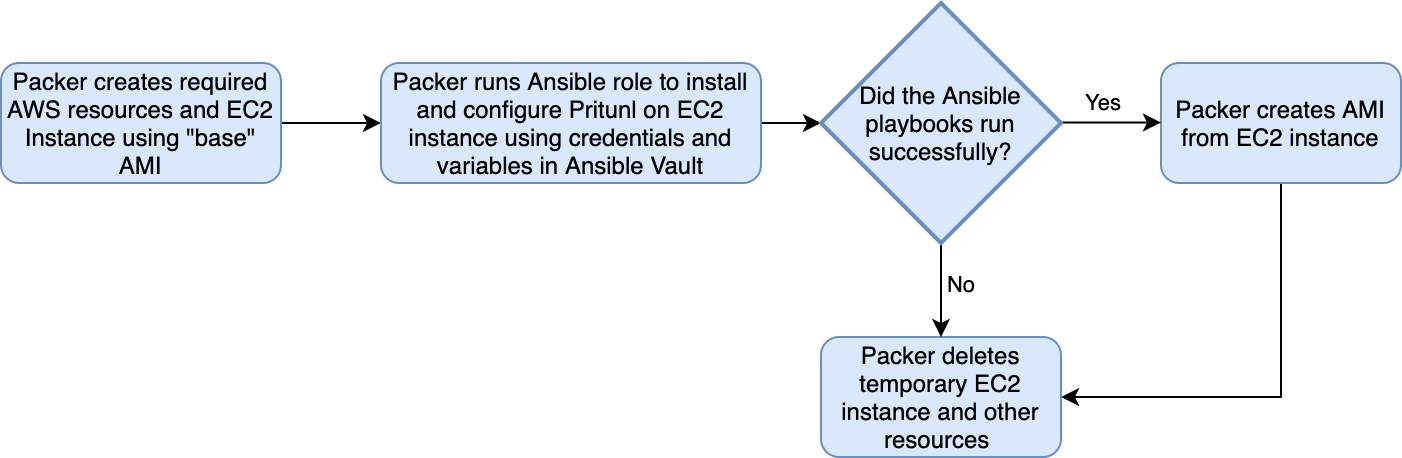
The packer commands are ran by a script in the repository called build.sh
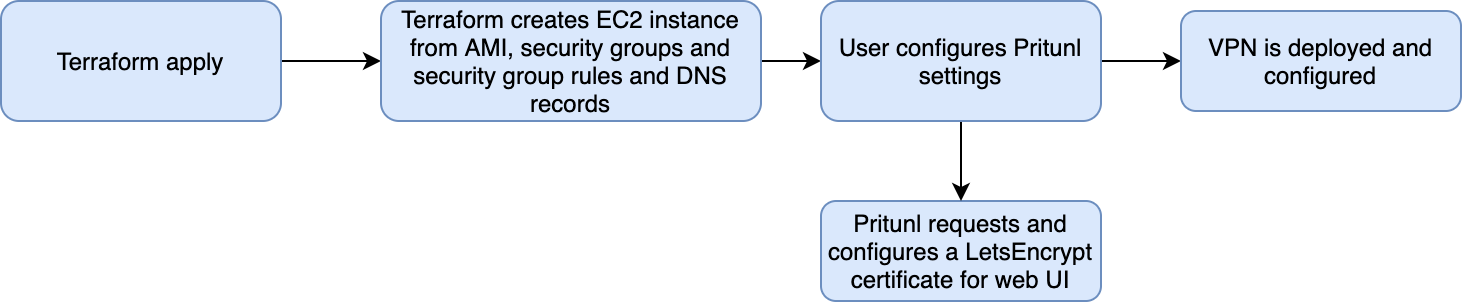
Then we deploy the VPN (and other AWS resources) using Terraform then configure Pritunl:
#Set-Up
You will also need the following:
- A working AWS Account
- AWS CLI Configured
- A GitHub profile with your public SSH keys added
You'll also want to clean the git repository to follow along:
1git clone https://github.com/jxeldotdev/vpn-ansible-packer
#Creating the AMIs
#What is Packer?
In this case we are using HashiCorp's Packer to create multiple AMIs and run an Ansible playbook and role on it.
To quote Packer's documentation, packer is:
Packer is an open source tool for creating identical machine images for multiple platforms from a single source configuration. Packer is lightweight, runs on every major operating system, and is highly performant, creating machine images for multiple platforms in parallel. Packer does not replace configuration management like Chef or Puppet. In fact, when building images, Packer is able to use tools like Chef or Puppet to install software onto the image.
Packer is commonly used with a Provisioner such as Ansible to run commands, install and configure an application, etc.
#Ansible and Ansible Vault
To quote Ansible's website, Ansible is:
Ansible is a radically simple IT automation engine that automates cloud provisioning, configuration management, application deployment, intra-service orchestration, and many other IT needs.
And Ansible Vault is:
Ansible vault is a tool commonly used with Ansible to store encrypted variables that can be accessed by Ansible. In this case we are using it to store passwords for users that ansible will create.
In the ansible directory in the repository, there are two roles - jfreeman-secure, and jfreeman-pritunl.
The role jfreeman-secure does the following:
- Updates the SSHD configuration (Disable root ssh, only allow key-based authentication)
- Sets SELinux to enforcing mode
- creates users for Ansible / Maintenance (And adds SSH keys)
- Installs useful debugging utilities
- Optionally configures automated updates
And the role jfreeman-pritunl does the following:
- Disables firewalld
- Installs MongoDB
- Installs Pritunl
You will see more about the roles and other Ansible playbooks.
#Creating a Vault and configuring Ansible variables
This vault that we've created will be used to store encrypted variables that are used in the ansible playbook and role. Now, run the following to create a Vault. Enter a password for the vault when prompted.
1# Create the Ansible Vault
2ansible-vault create ./ansible/vault.yml
Create the following variables in the vault:
vault_ansible_user_password: Hashed password for the 'maintenance' user ansible will create.vault_root_password: Hashed password for the root useransible_become_password: Plaintext password of the 'maintenance' user. This is usd by Ansible to connect to the instance.
You can create a hashed password by running the following python code:
1python3 -c 'import crypt,getpass;pw=getpass.getpass();print(crypt.crypt(pw) if (pw==getpass.getpass("Confirm: ")) else exit())'
It will have output similar to the following:
1Password:
2Confirm:
37kecPY5wTbQJ.
If you are using RHEL as your OS, you'll need to add the following variables so it can be activated.
vault_redhat_org_idvault_redhat_activation_key
#Creating the Vault Password File
Next you will need to create a file containing your vault password that can be used by packer.
1echo "your-vault-password-here" > ansible/vault-password
#Configuring the Ansible playbooks and roles
You will also most likely want to modify the following variables in ansible/base.yml:
github_keys- This is the link to your github profile's public ssh keys.ansible_user_name- Name of the user that will be created on the VMactivate_rhel- Whether to activate RHEL or not. Set this to false if you are using CentOS.
1- name: Setup base configuration
2  hosts: all
3  # remote_user is ignored by packer, set for when running manually.
4  remote_user: ec2-user
5  become_method: sudo
6  become: true
7  vars_files:
8    - vault.yml
9  vars:
10    # vault_redhat_org_id, vault_redhat_activation_key and ansible_user_pasword are in vault
11    # If you're not using redhat, set activate_rhel to false
12    #activate_rhel: false
13    #vault_redhat_org_id: example-not-used1
14    github_keys: https://github.com/jxeldotdev.keys
15    ansible_user_name: jfreeman
16    setup_automatic_updates: yes
17  roles:
18    - './jfreeman-secure/'
One thing you might notice if you look in the Ansible roles is that I disable firewalld. This is reccomended in Pritunl's documentation to not cause any issues, and it isn't much of an issue since we're using an external firewall in the form of AWS security groups anyway.
#Building the AMIs with Packer
There's two Packer configuration files in the git repository. is for a base AMI whereas the second is for the AMI with Pritunl installed and configured.
Below is the packer configuration for the base AMI. It is located at ./packer/packer-rhel8-secure.pkr.hcl
1variable "vault_pw_file_path" {
2  type = string
3}
4
5variable "vault_path" {
6  type = string
7}
8
9source "amazon-ebs" "rhel8" {
10  source_ami    = "ami-01ae9b7a0d2d87a64"
11  region        = "ap-southeast-2"
12  instance_type = "t2.micro"
13  ssh_username  = "ec2-user"
14  ami_name      = "packer-rhel8.4-base-{{timestamp}}"
15  encrypt_boot  = true
16}
17
18build {
19  sources = ["source.amazon-ebs.rhel8"]
20
21  provisioner "ansible" {
22    playbook_file = "./ansible/base.yml"
23    extra_arguments = [ "--vault-password-file=${var.vault_pw_file_path}", "-e @${var.vault_path}" ]
24  }
25}
Note that source_ami = "ami-01ae9b7a0d2d87a64" controls which AMI is used for the base image, and that ami-01ae9b7a0d2d87a64 is the ID of RHEL 8.4 AMI on AWS in ap-southeast-2.
You will need to change this to your desired AMI in your correct region. Note that the Ansible role only supports RHEL 8 and CentOS 8.
If you're using CentOS, you can find the correct AMI for your AWS region on CentOS's website
Below is the second Packer configuration file, which controls how the AMI we are creating with Pritunl installed
1data "amazon-ami" "rhel8-base" {
2  filters = {
3    virtualization-type = "hvm"
4    name                = "packer-rhel8.4-base-*"
5    root-device-type    = "ebs"
6  }
7  owners      = ["self"]
8  most_recent = true
9  region      = "ap-southeast-2"
10}
11
12variable "ssh_username" {
13  type = string
14}
15
16variable "vault_pw_file_path" {
17  type = string
18}
19
20
21variable "vault_path" {
22  type = string
23}
24
25
26source "amazon-ebs" "rhel8" {
27  region        = "ap-southeast-2"
28  instance_type = "t2.micro"
29  ssh_username  = var.ssh_username
30  source_ami    = data.amazon-ami.rhel8-base.id
31  ami_name      = "packer-rhel8.4-pritunl-{{timestamp}}"
32  ssh_agent_auth = true
33  encrypt_boot  = true
34}
35
36build {
37  sources = ["source.amazon-ebs.rhel8"]
38
39  provisioner "ansible" {
40    playbook_file = "./ansible/pritunl.yml"
41    user          = var.ssh_username
42    extra_arguments = [ "--vault-password-file=${var.vault_pw_file_path}", "-e @${var.vault_path}" ]
43  }
44}
You'll need to create the 'base' AMI first.
Before you build the AMI, ensure the following:
- You have your AWS CLI credentials configured
- You have a SSH key that is added to your GitHub profile configured
- You have
ssh-agentconfigured with one of the SSH keys on your GitHub Profile.
- You have
- You have your Ansible Vault and vault password file created
Run the following to build the base AMI:
1./build.sh base-ami
Then, you can build the AMI with Pritunl installed.
1./build.sh pritunl-ami
In the output of the build it will show the default password for pritunl - be sure to note this down!
If you can't see it in the build log, you can search for it in the log file, build-log. It will be located in the root directory of the git repository.
#Deploying the infrastructure on AWS using Terraform
Terraform is used to manage the AWS resources. For deploying the VPN, I have created a reusable terraform module.
One of the reasons I have created a reusable module is that I plan to use it in a mock production environment I am creating for a personal project, in which I will deploy a highly available "todo app" on AWS EKS (Elastic Kubernetes Service).
The Termodule creates the following resources:
- EC2 Instance
- Security Groups
- Security Group Rules
- EC2 Keypair
It does however require the following resources:
- VPC
- Public subnet
If you don't already have a VPC in you, you can create one by using this module. It will also create subnets:
1module "vpc" {
2  source = "terraform-aws-modules/vpc/aws"
3
4  name = "my-vpc"
5  cidr = "10.0.0.0/16"
6
7  azs             = ["eu-west-1a", "eu-west-1b", "eu-west-1c"]
8  private_subnets = ["10.0.1.0/24", "10.0.2.0/24", "10.0.3.0/24"]
9  public_subnets  = ["10.0.101.0/24", "10.0.102.0/24", "10.0.103.0/24"]
10
11  enable_nat_gateway = true
12  enable_vpn_gateway = true
13
14  tags = {
15    Terraform = "true"
16    Environment = "dev"
17  }
18}
Here's the documentation for the VPC module shown above
Below is an example usage of the terraform module I created to deploy the VPN to AWS. Since the module doesn't create a DNS record, you'll need to create your own.
A full example including a Route53 DNS record and VPC is below.
1module "vpc-dev" {
2  source = "terraform-aws-modules/vpc/aws"
3
4  name = "vpn-example"
5  cidr = "10.0.0.0/16"
6
7  azs             = ["ap-southeast-2a", "ap-southeast-2b", "ap-southeast-2c"]
8  private_subnets = ["10.0.1.0/24", "10.0.2.0/24", "10.0.3.0/24"]
9  public_subnets  = ["10.0.101.0/24", "10.0.102.0/24", "10.0.103.0/24", "10.0.104.0/24"]
10
11  enable_nat_gateway   = true
12  single_nat_gateway   = true
13  enable_dns_hostnames = true
14
15  tags = {
16    Terraform   = "true"
17    Environment = "development"
18    Owner       = "Operations"
19  }
20}
21
22module "vpn" {
23  source = "github.com/jxeldotdev/vpn-ansible-packer//terraform/vpn"
24
25  instance_name   = var.instance_name
26  key_pair_name   = "pritunl-key"
27  pub_key         = var.pub_key
28  sg_name         = "vpn"
29  sg_desc         = "Opens required ports for Pritunl VPN and its Web UI."
30  subnet_id       = element(module.vpc-dev.public_subnets, length(module.vpc-dev.public_subnets) - 1)
31  vpc_id          = module.vpc-dev.vpc_id
32  vpn_client_cidr = "172.16.1.0/24"
33  home_ip         = var.home_ip
34  webui_port      = 443
35  vpn_port        = 6823
36  user_data       = "hostnamectl set-hostname ${var.instance_name}"
37}
38
39data "aws_route53_zone" "zone" {
40  name         = "yourdomain.com."
41  zone_id      = "YOURHOSTEDZONEID"
42}
43
44resource "aws_route53_record" "vpn" {
45  zone_id = data.aws_route53_zone.zone.zone_id
46  name    = "vpn.yourdomain.com"
47  type    = "A"
48  ttl     = "300"
49  records = [module.vpn.public_ip]
50}
You will also need to configure the following Terraform Variables:
1variable "home_ip" {
2  type = string
3}
4
5variable "pub_key" {
6  type = string
7}
8
9variable "instance_name" {
10  type = "string"
11  default = "syd-rhel8.4-pritunl-0"
12}
#Configuring Pritunl
Since not all of the Pritunl installation can be automated with Ansible we have to finish the installation manually.
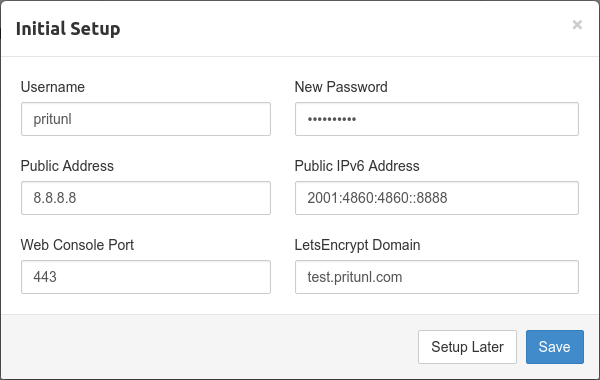
Login to the Web UI and you'll see an inital setup box.
Enter the respective values for your environment and make sure there's a DNS record for your server so a valid LetsEncrypt certificate can be generated.
Now you can configure Pritunl as you wish. I personally enable WireGuard and Google Authenticator.
Hopefully this guide helped! You can view Pritunl's documentation for more information on configuration.